 |
| Raspberry Pi 3 + 7" Touchscreen (left) and Squeezebox Touch (right): for the Pi device, I still had the plastic screen protector on in the picture, hence the bottom left tab... |
In this post, let's have a closer look at the device and some instructions / suggestions to build one.
I. HARDWARE
First, let's address the components I'm using to build this device:1. Raspberry Pi 3 Model B (~US$40).
 |
| Note that I added a little "stick on" heat sink over the CPU - generally not necessary but might drop the temperature a few degrees. |

3. SmartiPi Touch enclosure (~US$30). I have the one without LEGO front studs so as to look cleaner but feel free to get the LEGO one if you want to adorn the device with your favourite Lego superheroes. I'm sure it'll sound the same :-). This enclosure started life as a Kickstarter project. It includes a convenient Y-cable for efficient USB power connection and its own longer ribbon cable (15-way FPC) for the screen. By using only the DSI (Digital Serial Interface) connector, the GPIO port is open for HAT boards like a DAC or S/PDIF digital audio board. There are other cases out there of course like this one, but I think the SmartiPi Touch with its adjustable view angle and well-thought-out design (cut-out for CPU heatsink, ability to use HAT board) is the best design I have seen to date.
It's made of reasonably strong ABS plastic which is fine. However, I certainly would love to see higher workmanship in the quality. For example, the edges could be smoother and the flat parts could have less inconsistency. It would be awesome to see a brushed metal enclosure for example. Maybe some enterprising company can bring something like that out without costing more than the actual active electronics!
4. OPTIONAL: HiFiBerry DAC+ Pro (~US$50) for high quality analogue output (previously measured). Remember that USB digital output is already available from the Pi without any HAT board. Of course, if you prefer digital S/PDIF connections, get the HiFiBerry Digi+ Pro (~US$55) (the best of 3 models they have, with dual crystals for more accurate 44/48kHz samplerate families).
 |
| HiFiBerry DAC+ Pro HAT sitting over the Pi 3. |
6. Grab a reasonably fast microSD card for the OS and software install - like this SanDisk Ultra 16GB (~US$10) will do.
So the price for my build including the DAC+ Pro would be a grand total of: $210 + tax (current Amazon prices rounded up), assuming I needed to buy the power supply and microSD card (both of which I already had lying around in the home). Not bad at all. Just have a look at how much a new-in-box or lightly used Squeezebox Touch goes for these days.
 |
| Everything laid out and ready to assemble... |
No need for me to repeat what others have done! Here's a very thorough video of how to install the SmartiPi Touch case, touchscreen, Pi 3, and HAT board:
Simpler than any computer build I've put together :-).
There were a couple of things I needed to do in my build to keep in mind. First, my heat sink fins were a little larger than the cut-out for the SmartiPi Touch case. I had to use some needle nose pliers to bend the outside pins about a millimeter in to fit it within the SmartiPi plastic heat sink cut-out:
 |
| Note the cut-out with heatsink visible inside. |

Here are a few pictures of what the device looks like after assembly, powered by a battery and connected to my Server with the built-in WiFi:

Notice that I can power the device quite comfortably with an APC Mobile Power Pack Li-polymer battery meant for cell phones and tablets (10,000mAh with 5V, 2.4A USB port).
 |
| Rear: You can see the HiFiBerry DAC+ Pro hitched to the back. Note that the RCA connectors point down; be careful with unusually large/long/stiff RCA cables. There's the Y-connector for power to the screen and the Pi. Also, notice the LEGO connector up top for Pi camera and whatever adornments :-). |
 |
| Left side: The Pi has ethernet and USB ports off the side. Cosmetically, you can get something like a 90° USB port adaptor so the cables don't obviously stick out the side too much. |
II. SOFTWARE
Okay, here's then how to get the software loaded and getting piCorePlayer "live" on the device.1. Grab piCorePlayer off the website - notice that the current version as of this writing is 3.11. I grabbed the "Audio optimized" version:

2. Transfer the software over to your microSD; you might need a card reader/SD adaptor (L: drive in the image below). I use Win32 Disk Imager. Mac folks can use ApplePi Baker.

3. Stick the microSD in the Pi 3, connect to wired ethernet (remember, WiFi not set-up yet), plug into power supply, and give it 5-10 minutes to start up. Then go into your router to find the IP address of your device. Other ways include running Net Analyzer if you have an iPhone/Pad connected to your router. Also, Advanced IP Scanner on Windows could be useful.
IP addresses on my LAN:
 |
| As you can see, my piCorePlayer IP is 192.168.1.121. |
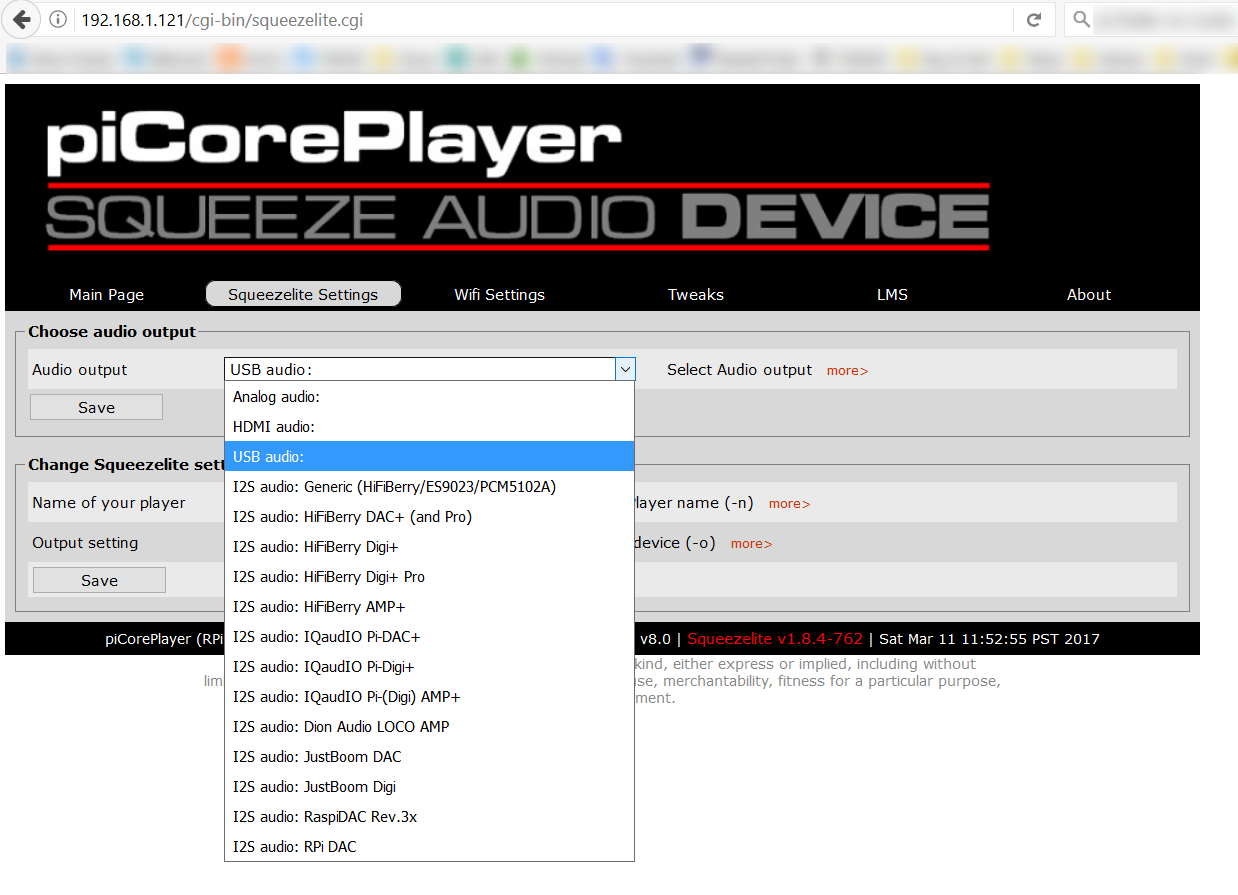

5. Now, it's time to get the touch screen GUI working. That involves activating jivelite. First, go to the bottom of the control panel and click on "Advanced":
 |
| Click on "Advanced". Notice "Audio output" and "Output setting" are set up for my USB TEAC UD-501 DAC. |

With that you should see piCorePlayer downloading, installing and starting jivelite. And the touchscreen should come to life:

In the event that the screen is upside-down like what you see above, just change the "Rotate screen" setting below "Jivelite" activate, and save. The unit will restart with proper orientation.
6. Feel free to play with piCorePlayer! It's very powerful and can even run LMS if you have music mounted and want the Raspberry Pi to run as a music Server itself to stream to other devices in the home.
7. Modify the settings in jivelite to your preference:

I like the screen to turn off when not playing anything to save power...

Also, I find the default max brightness too bright. A value of 25-50 is good enough for me in my relatively dark sound room on relaxing evenings:

It's all relatively straight forward. For those more visually oriented, here's an excellent video HOWTO:
Notice on the video, he's using the Meridian Explorer 2 DAC and speaks about specific settings for that USB DAC and making it work with MQA... Also, he does a great job with getting LMS running from within piCorePlayer so your Raspberry can act as a low power Server to other devices on the network.
III. TWEAKS
Remember, with an open architecture like the Pi 3, there are all kinds of other things you can do. For example, other then piCorePlayer, you might want to try Volumio with the touch screen (check out the "Touchscreen plugin" section on this page). RuneAudio is also possible, check out this video.Also, remember that the Pi 3 has quite a capable quad-core CPU. That's enough processing power for some simple DSP... Upsampling to 384kHz to feed my TEAC was no problem through piCorePlayer and I'll perhaps spend some more time on this in a future post showing setting options and impulse responses to play with. There's likely not enough computing speed for full-on high-resolution stereo room correction but perhaps decoding for HDCD or MQA Core (24/96) could be done? I'm throwing the MQA decoding idea out here because we know the Bluesound Node 2 has a software MQA decoder already and the CPU on that device is just a 1GHz, likely dual-core Cortex-9. Of course this is not about hardware ability, but licensing issues and legalities around decoding the MQA file.
Remember, for the tweakers, give my Convoluted Rationalization And Audiophile Perceptions (CRAAP) settings a try. Just take the microSD out from the Pi 3 after the piCorePlayer setup. Stick it in a card reader on your computer, and apply the following to the "config.txt" file on the microSD <Thanks Seng Yew Meng for correcting over_voltage_sdram!>:
arm_freq=800
sdram_freq=400
core_freq=400
gpu_freq=300
over_voltage=-4
over_voltage_sdram=-4
gpu_mem=16

Unmount and stick the microSD card back in the Pi 3 and reboot... Voilà - underclocked, undervolted Raspberry Pi 3 with potential to save you a few pennies in electrical costs, keeps the device cooler, and sounds great :-). Still plenty of speed and snappy user experience. Can't go wrong with that IMO... [November 2017 Update: These days I run the undervolting with -2 instead of -4... Just found it more stable during the heat of summer.]
IV. CONCLUSION
Have fun! As I discussed previously, it really is great how much we can accomplish with inexpensive computing gear these days. This device has been trouble free for the last month and "sounds" great. I'll do a few measurements in the days ahead and compare it to the Squeezebox Touch. Particularly, I am curious if the touchscreen adds any noise to the analogue audio output from the HiFiBerry DAC daughterboard.One last thing... Remember that Squeezebox devices are supported under Roon. Although I no longer have a Roon setup currently, I "hear" that piCorePlayer works well. However, running Roon Bridge on the Pi does provide important RAAT features like gapless playback, better integration into the software zones, etc... Unfortunately, I don't believe there is currently Roon Bridge support of the touchscreen - hopefully this will change in the near future! Even a simple UI and ability to display artwork on the screen with Roon would be great.
--------------------------
Costa Rica is a great country to visit and travel through over the last 2 weeks... But as an audiophile, one of the first things I did when I got home was to fire up the sound system and enjoy a couple of hours of sweet music. Cannonball Adderley's Somethin' Else fits the bill nicely as my welcome home album, followed by Bowie's Sound + Vision box set (the 4 CD 2014 remaster at DR10 sounds OK, have not heard the 1989 Rykodisc original).
Like last year in Mexico, the Central American electronics stores seem to like carrying big and "aggressive" bad-ass plastic speakers with pulsatile multi-colored LEDs adorning the devices:
 |
| Glowing speakers, baby! :-) |
As usual, I hope everyone has a great week ahead.
Hope you're enjoying the music!
Addendum: May 20, 2017
MEASUREMENTS for this "Pi Touch" device is now up.
Hope you're enjoying the music!
Addendum: May 20, 2017
MEASUREMENTS for this "Pi Touch" device is now up.
Great article Archimago! I run piCorePlayer in addition to Volumio and still find it a challenge to figure out the IP address of the device during setup. I use an Apple Airport router but plug the Pi into my Mac and turn on Internet Sharing to give it an initial Internet connection. Have to resort to obscure Unix network commands to figure out the IP every time.
ReplyDeleteFor people burning microSD images they should give Etcher a try - https://etcher.io/. Free, open source software with a very nice user interface. Runs on both Windows and Macs.
Thanks for the note Jim. Excellent suggestions!
DeleteJim: You typically won't need to know the IP address, only the configured device name, so if you named your Volumio device "volumio", it would be accessible through "volumio.local"
DeleteI Arve, I was referring to piCorePlayer. I'm actually a contributor to Volumio, I created the newest version of the Spotify plugin. It seems to have broken recently with personal playlists and I'm trying to figure out why right now!
DeleteLooks like a fun project, and I may give it a try, but I think I'm missing something: where is the music coming *from*?
ReplyDeleteI don't see that you installed any streaming software, and don't describe your server, as far as I can tell - probably just missing it!
Hello...
DeleteMusic being streamed from my Server computer as described last week as a "Type 2" system:
http://archimago.blogspot.ca/2017/03/musings-computer-audio-part-ii-basics.html
Simple AMD A10-5800K system in the basement office running LMS.
Thanks - I didn't connect the two posts, though I read both ;)
DeleteHi Dragonist,
ReplyDeleteI personally don't have Spotify Connect but I see there is a tutorial for Volumio here:
https://volumio.org/forum/spotify-connect-volumio-with-usb-sound-card-t4658.html
Maybe that combined with the touchscreen plugin?
I've heard rumors that it's doable on piCorePlayer but have not seen a thorough post/how-to on this.
Others have experience?
Great post. After three years of thinking about building a Pi as a Touch replacement maybe this will finally cause me to act on it.
ReplyDeleteBut in the mean time, I have been using an $80 option that works well and sounds great. And there's no Linux involved.
Instead of a Pi, the heart is the Chromecast Audio ($35) which you have shown is a capable streamer when using it's optical output, although only up to 96/24.
The soul of the setup is an Android running the SqueezePlayer app and a Squeezebox control app (I use OrangeSqueeze). I bought an inexpensive pre-pay phone ($40) with the same size screen as the Touch. A larger phone or a tablet would work too.
To make everything more "Touch-like" I added a $3 aluminum stand for the phone.
Here are a couple of pics showing the "pseudo-Touch" in use with my headphone system.
https://goo.gl/photos/7XT5ZRpT9EXfzuU87
The Chromecast is sitting on the second shelf, next to the headphone amp. The Touch is in the background for comparison. The phone is connected to it's charger so I can keep the screen on all the time.
The one "flaw" in this setup is the fact that the music is streamed from LMS (with DLNA switched on) to SqueezePlayer and then "cast" from the Android to the Chromecast using the phone's native casting function. This extra step along the data path disturbs the audiophile in me but, bits is bits, and in direct comparison to the Touch I can't hear a difference. And doing it this way allows for gapless playback, something the Chromecast doesn't support on it's own.
I recently discovered an Android app called Hi-Fi Cast that offers a simpler way to play files from your local network. It bundles the functionality of SqueezePlayer, OrangeSqueeze, and Android casting into one app. Just start it up and you are ready to play. Again, all data runs through the phone, and it supports gapless.
Of course, I can also run apps that cast directly from the cloud to the Chromecast, like Tidal and Spotify. And BubbleUPnP, which streams 96/24 FLAC from my Google Drive cloud storage with no problem.
So, for around $80 I have a fully functional, and then some, Touch replacement. (App licenses added a few dollars to the total in my case.) If you choose to use your personal phone, or have a suitable old one lying around, all you really need is the $35 Chromecast Audio.
Thanks for the detailed description Mark! That's pretty nice looking and a great way to integrate the Chromecast Audio.
DeleteThe Pi environment is quite a lot of fun. One alternative way to create a Squeezebox Touch is to deviate from the above recipe by using the official Pi display case and the PiDacZero (which works just fine with the Pi3 too). Provided one is willing (and able) to cut a square hole in the lid at the back of the official case, and to use right angled RCA leads, this makes for neat looking device, without any bit of PCB showing (alternatively removing the back lid works well).
ReplyDeleteAnother useful trick is to use one or multiple USB mini-sticks (such as Samsung Slim Fit 128GB devices), to get a wirefree and silent device.
Great suggestions. Indeed many opportunities to be creative in mixing and matching the devices. I see here's the Pi-DACZero site:
Deletehttp://iqaudio.co.uk/audio/38-pi-daczero.html
Can't beat the price as well... Good to know that it works with the Pi 3 even though the web page puts a "NO" on the "Raspberry Pi3 compatible" row. I assume it's just the form factor is more suited to the Pi Zero?
Those Samsung Slim Fits are very cute!
;-) The pi-daczero does fit well, and no soldering is required with a bit of creativity to power the display as well as the Pi3 and DAC.
DeleteHere are snapshots of what it looks with lid on and off: https://flic.kr/s/aHskTUVUgn
Balbuze has developed two Spotify Connect plugins for Volumio which you can download here: https://github.com/balbuze/volumio-plugins. Volspotconnect is stable and I've been using it successfully for months. Volspotconnect2 is based on a different starting point, and at an alpha stage.
ReplyDeleteTo use either, just download the zip file and drag and drop it to the Add Plugin page on Volumio. You may want to do a reboot after that.
Nice Jim. Thanks!
ReplyDeleteAn other amazing article Archimago ! With this touchscreen it's the missing link for an ergonomic use. Let's go and try it. I used until now the software of my Synology NAS directly to my UD 501 (by usb) but after many of yours articles (odroid and raspbery) it's time to change.
ReplyDeleteHave fun with this!
DeleteBasically all the functionality of the Squeezebox Touch and a very familiar interface for anyone who has ever used the old Logitech device...
Can a traditional NAS ( SAMBA ) be used to serve the files to the Pi3 \ PiCorePlayer?
ReplyDeleteWithout an LMS server elsewhere in your network, with piCorePlayer, you have to activate LMS in the program and point at the SAMBA/CIFS... See the "Setup Network Disk Mount" section in the LMS tab.
DeletePersonally I have not done this so can't directly testify on how well it works. Should work :-).
Anyone else have experience they can share?
BTW, Volumio and RuneAudio can access SAMBA/CIFS shares over the network as well...
Running LMS and setting up a Samba server with PiCorePlayer works very well with one disk/USB stick.
DeleteWith two sticks, I'm not able to create new directories from my PC on the second drive mounted on the Pi, but it may have to do with my limited knowledge of linux (Everything else works well, so I'm only looking at this now).
I will try as soon my doughters let me some free time to spend with a a spare Pi.
ReplyDeleteIn the meanwhile, according to you, do you think thare should be any (audible\measureable) difference in playing hi-res music from a Pi3 using pure Linux+MPD vs PiCorePlayer.
In this moment I have a Pi3 with MPD controlled by MPDroid on an unused smartphone and an old demo HP x1011 convertible notebook with JRiver
Files are stored on an HP Proliant + Ubuntu
Hi Sonus.
DeleteBased on previous explorations with MPD and software like Volumio, no, there will be no measurable, logical, nor IMO audible difference between any of the software assuming of course it was installed with bit-perfect output comparing with piCorePlayer.
So long as there are no buffer under-runs from the NAS and server computer, there will be no issues. As usual, if we're talking about an asynchronous USB interface connecting the Pi3 to the DAC, then there will be no jitter differences either.
Have fun!
What if one wanted 1) bit perfect digital output of 2) lossless and lossy 5.1 audio files, to send to an AVR? For lossless 5.1 I'd think HDMI would be a minimum requirement. Is there a version of this mini-setup that can do that? (Right now, I do it with my laptop, foobar2k, and an attached hard drive of music files..haven't gone the wireless route yet)
ReplyDeleteCorrect Steven,
DeleteIf you want 5.1, you're gonna need HDMI to the AVR. The SmartiPi enclosure unfortunately blocks the HDMI output so a different enclosure would be needed.
Currently the only "easy" way I see to stream 5.1 is with Kodi pointing to your library of multichannel music. I have a separate Amlogic S905X-based Kodi box which is mostly for movie streaming (including lossy AC3, DTS bitstreams of course) and multichannel audio in 5.1 FLAC. It works pretty well. Haven't tried this with the Pi 3 though.
I'd be curious on your thoughts about the new XLR-version of the HiFiBerry DAC+ Pro.
ReplyDeleteI just ordered one.
As I promised, I setup pCorePlayer on my Rpi3 with very good result using the wired Ethernet. With WiFi... it is a nightmare... playing high res FLAC files i got a lot of pops, glitches and scratches. With Raspbian and pure MPD it is perfect, even with WiFI.
ReplyDeleteThen I got the official Raspberry LCD touch screen.
performances dropped to very bad quality.
I tried even Volumio and RuneAudio... same thing.
I tested another Rpi3 (so, one made in UK and antoher made in Asia)... same problems... lot of "noise", I mean pops, glitches, spike, etc.
So... my Rpi3 is always perfect with high resolution FLAC, regardless the distribution (pCorePlayer, Volumio, pure MPD, RuneAudio), but activate the LCD\touch and load the appropriate plugin... it is nightmare.
Disabling both wired and WiFi network and loading FLAC from a USB thumb memory does not solve.
I am using a M2Tech USB async DAC.
Any suggestion?
Thanks a lot.
But does it support MQA?
ReplyDelete
ReplyDeleteWe’ve been stumbling around the internet and found your blog along the way.
We love your work! What a great corner of the internet :)
5 Wire Resistive Touch Screen
Thanks so much! My aging Squeezebox has now been replaced with one a lot like yours (just with the Touch 2 case with an optional back and a Pi 3B+.) So much better!
ReplyDeleteI really appreciate the time you took to lead us newbies through.
Just found this thanks to Google. Many thanks for posting this. I also need to replace my 2 Squeezeboxes, still working after 15 years, great build quality. To make it wife-acceptable, do these projects use a remote control, or can they be controlled only using apps?
ReplyDeleteAnswer to myself:
DeleteI followed these great instruction, eerything worked first time. Out of the box, there is no hardware or software for IR remote control included. A RC sensor can be be attached to the GPIO pins of the RPi, but then the command codes specific to your RC model need to be programmed.
I have many many of these with various DAC's. I stream form a Vortexbox (vortexbox.org) which is Logitech Media Server based (LMS). If you connect the player to your LAN LMS will automatically find it. Look on your LMS webpage (LMS server IP address port 9000) and click the settings (bottom right). On the information tab u will see the IP address of your newly connected player.
ReplyDeleteThis comment has been removed by a blog administrator.
ReplyDeleteHow would I set this up to play sound from my TV in addition to music? I don't have space for a cinema room AND a music room so music comes first and I just have a dumb TV with an optical output but have network cables everywhere and the ability to install more. There don't seem to be many (if any) Rapberry PI HATs out there with an optical input.
ReplyDeleteHello, great article. I have the same setup. How did you get the album covers to show with large thumbnails.. i see my albums as a list.
ReplyDelete