Let's do a quickie post this week.
As per the discussions last time, I've been doing some computer upgrades here at home and at one point a few weeks back, I was updating the BIOS on my AM4 MSI X370 SLI Plus motherboard but accidentally disrupted the power in the middle of the flash!
This basically "bricked" the machine because this particular board only has one BIOS bank and there are no facilities to reflash. Since my AMD Ryzen 7 1700 CPU is still a very reasonable 8-core processor that can still be used for many applications these days, I looked for an inexpensive way to fix this BIOS mistake. The solution is the package shown above - a CH341 24 and 25-Series EEPROM Flash Programmer (less than US$15, this item on Amazon Canada).
There are many generic versions of this kind of CH341 programmer available on places like Amazon and they all should be less than US$20 for what I'm doing here. Obviously there could be different quality products out there, so have a good look at the comments/reviews.
Basically what we want to do is to rewrite to the BIOS flash chip with fresh (likely latest from the manufacturer) firmware. I'll be using Windows for this article.
Steps:
1. Disconnect the motherboard, take out the CMOS lithium battery, and check which EEPROM chip you have. Most modern motherboards will have surface-mount small SOIC8 (8-pin chips) these days. Here's what it looks like on my MSI motherboard:
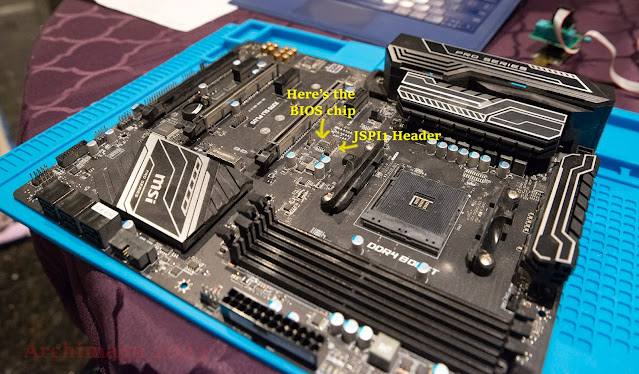 |
| Note the JSPI1 header nearby which can be used to program the flash as well. We won't be using it for what I did here. |
And a closer look allows us to identify the BIOS chip which is important:
As you can see, we have a Winbond 25-series 128Mbits EEPROM, the "W25Q128FW". Here's the datasheet and we can see that it's a ~1.8V (1.65-1.95V) product. Typically, SPI (Serial Peripheral Interface) runs at ~3.3V so for 1.8V, use an adaptor.
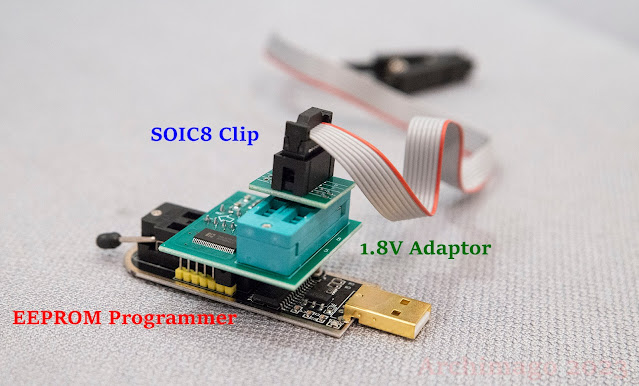
2. Now assemble the EEPROM programmer with all the bits and pieces:
Quite the sandwich of bits and pieces! Putting this together should be relative self-explanatory based on your kit's instructions. Just make sure pin 1 (red wire) is properly aligned for each of the layers and where there is a choice, select the appropriate "25" or "24" flash series pins. Based on the BIOS chip, for me, the sandwich above is for the "25" series.
Here's another look:
3. Grab ASProgrammer software. Extract the ZIP and install the CH341 driver "CH341PAR.EXE" from the "drivers\CH341\" directory:
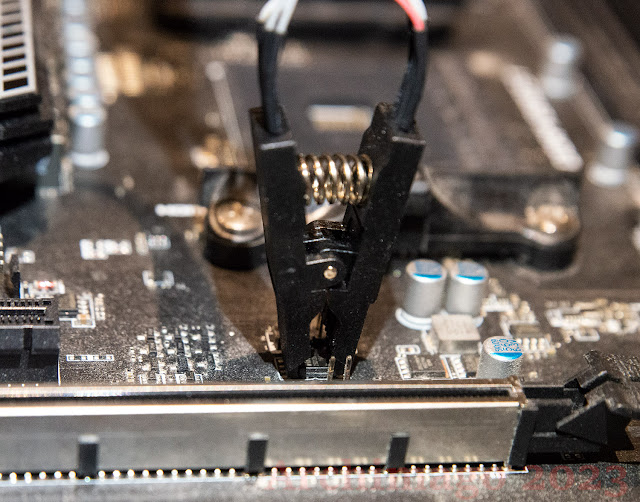
4. Plug in the CH341 sandwich contraption to your computer's USB port (I just used my older Surface 3 laptop for convenience), it should be recognized by the driver. Then put the SOIC8 clip to the flash chip you identified in Step 1:
I found the clip on my kit latched on to the flash chip pins and seated quite securely on the first try; just be careful and visually align the pins. I've heard that there's some variability in how well some clips perform.
Here's a closer look:
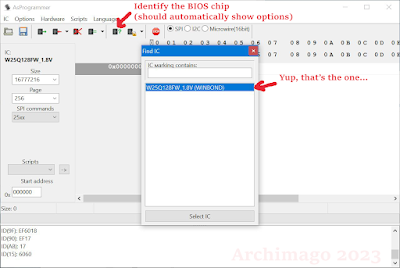
5. Run the "AsProgrammer.exe" software, click on the green "Read ID" button, and select the appropriate BIOS chip
6. Read the chip (green arrow button at the top) and save current contents for backup if needed. Given that I have a bad flash and the BIOS data is "broken", this is really not necessary for me.
7. Grab the firmware you want to flash - for me I went to the MSI X370 SLI Plus motherboard support page and downloaded the latest BIOS file I wanted to program.
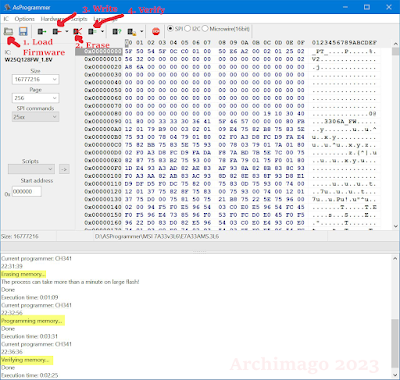
8. Now from ASProgrammer, load in the firmware file you want to write, do an Erase, Write, and Verify cycle. The end result assuming no errors should look like the log in the bottom of this image (each step highlighted):
You can also manually verify once written by reading the contents of the flash chip (green arrow button at the top) and saving the data to your computer, then in Windows command line, use "certutil -hashfile <filename>" to show the hash and compare that it's exactly the same as the BIOS file you're writing. For example, "Post-Write to Verify.bin" is the data read back from the chip after programming compared to the original "E7A33AMS.3L6" data:
Notice the highlighted yellow SHA1 hash is exactly the same. (Bits Are Bits, right? :-)
9. That should do it... Put the computer back together and let's hope the computer BIOS is resurrected!
 |
| Thermalright Assassin X120 Refined SE ARGB Cooler installed - excellent and cheap at less then US$20! Ryzen 7 1700 CPU, 32GB DDR4-3200. CMOS battery put back in. |
10. Resurrection!
Yay! Bad BIOS flash repaired. The MSI motherboard has arisen from its "bricked" state. Important for me since not many of the modern AM4 motherboards these days support first-gen Ryzen CPUs like my Ryzen 7 1700.
Want more details? Check out this article. And this excellent YouTube How-To video with instructions for Linux as well.
That's really easy to do and saved me from throwing an otherwise perfectly good motherboard in the trash or to be recycled. You might even find some "not working" motherboards on eBay and such places that were the result of failed BIOS flashes and can bring those back to life.
A little over 20 years ago, I built a simple EEPROM programmer with a circuit I found to reprogram the firmware for an old China-made Apex Digital DVD player so it could play multi-region DVDs. So much easier these days to reprogram. ;-)
--------------------
I've been listening to Daft Punk's Random Access Memories (Drumless Edition) released this past week; multichannel/Atmos version available on streaming. To be honest, I'm not sure why they released this version (the 10th Anniversary Edition was just out earlier this year). However, it is interesting being able to better hear the background vocals and instrument parts like the bass line much clearer which can be obstructed especially in the dense stereo mix once the percussion tracks are taken out.
As expressed previously, I find that multichannel presentations can allow the listener to appreciate more of the complexity in modern music by spreading the instruments and vocals wider around the listener. There's more space, and more speaker channels (with high quality playback in hi-fi), for the sounds to emanate from. Also, improved dynamic range helps bring out those nuances.
Have a nice week folks... Hope you're enjoying the music!






Thanks bud, it works awesome, exactly as you did. Huge thanks from Argentina
ReplyDeletefacing problem erasing the winbond chip in my gigabyte b450m ds3h. the same model with your article. using the same method but keep getting chip not fully erased depite using multiple software. any suggestion? or should i desoldered the chip and flash it off board?
ReplyDelete