
Readers on the blog will likely remember that last year, Ivan Khlyupin (aka IVX on a number of forums) of E1DA sent me a pre-production Cosmos ADC for testing and use. As discussed then, this affordable ADC unit turned out to be a remarkably capable device using the ESS Sabre ES9822Pro chip at a very reasonable price. With recent price upheavals, currently on Amazon for a Grade B device with SNR 127+/-1dB(A) in mono mode, it's selling for just less than US$250.
There were already discussions last year that the "Cosmos" line of devices would include the one we'll be talking about today - the Cosmos Analog Processing Unit (APU). As the name implies, this is an analogue device that serves the purpose of (pre)amplification with very low noise, also providing a 1kHz notch for accurate measurements of THD+N/SINAD as we typically see in DAC reviews.
With the APU near production release (possibly next month or so), Ivan again kindly sent me a unit for use here on the blog. Using the combination of Cosmos APU + good ADC (doesn't have to be Cosmos ADC), the user should be able to peer down into the noise limits and measure characteristics like dynamic range, and THD+N/SINAD with great accuracy even beyond the limits of modern state-of-the-art DACs.
 |
| Cosmos APU - front & back. Tech specs listed on the back of the unit. |
I. General Functions and Cabling
To start, let's just talk about the general principles around use of this device before we jump into actual measurement examples. Before running any "experiment", it's important to set the foundations first before capturing data to make sure we've thought through what's needed and how to "control" for potential variables.
This is an analogue signal amplification + notch filter device. The housing is an anodized aluminum of the same shape and approximate weight as the Cosmos ADC (~150g). It has a USB-C port in the back for 5V power only - no communications with your computer. When plugged in, a small amber LED beside the USB connector will light up to tell you there's power going in. The device doesn't use much power (350mA idle), so something like a lithium battery pack will perform well and provide isolation from other devices and AC mains hum.
What you do with the APU all happens up front where it has four 3.5mm TRRS phono jacks to plug in cables for signals in and out. The 2 main functions are: low-noise pre-amp on the left which provides an ability to amplify low-level signals with +34/60dB gain, and on the right, a -30dB notch filter for either 1kHz or 10kHz signals with Q ~50, and also +20/26dB gain.
Have a look at the official specifications here on the Cosmos APU page. E1DA lists a design using high-quality parts (apparently lots of fake components out there!). For amplification duties, a combination of THAT Corp 1510 (the main "Low Noise Amplifier" LNA used in the pre-amp), TI OPA1612, and RiCore RT6863S chips are utilized. While the inputs for both the pre-amp and notch filter are balanced TRRS (configured +/-/GND/GND), the outputs are unbalanced (+/GND/GND/GND). It's important to reduce noise particularly on the output lines by keeping cables short! This is a good example of the old audiophile dictum of "the best cable is no cable". For a typical balanced 1kHz 4Vrms device, -60dB amounts to 4mV (unbalanced 2Vrms would be 2mV at -60dBFS). When looking at such small signals, noise on the order of nano-volts can show up in testing!
As you can imagine with up to +60dB gain, be careful with feeding the APU too high of an input signal. Keep the pre-amp input below 3.5Vrms and the notch filter input below 10Vrms. In the case of severe overvoltage with excess current, there is TVS protection in the pre-amp section but this could burn out a small 10Ω surface mount 0603 resistor which acts like a fuse and would need to be replaced. (More tech details from Ivan here.)
One other useful feature you'll notice is the availability of +48V phantom power for condenser microphone input. There's a warning icon to make sure it's turned off when a line level device is plugged in as the voltage may cause damage. As further warning, there's an orange LED inside the 3.5mm phono input that lights up with phantom power engaged. Make sure to wait for it to fade (about 10-15 seconds) to indicate the voltage has been discharged before plugging in something like a DAC.
 |
| Orange LED when phantom power on. Make sure discharged before plugging in non-microphone input! |
Input impedance of the APU is 20/10kΩ balanced/unbalanced for the notch filter, 47/23.5kΩ balanced/unbalanced pre-amp with 100pF capacitance (these kinds of numbers will be familiar to vinyl folks). Output impedance of the APU is 47Ω unbalanced. Of note, if you're pairing the APU with the E1DA Cosmos ADC, 47Ω output impedance should be fine even at the lowest input impedance of 400Ω unbalanced at the 1.7Vrms input setting and even better with higher input levels with higher impedances.
So, as part of my preparation to start using this device, I went to the local electronics shop and bought some parts to build the following cables:
Male XLR → Male TRRS phono - about 6" for connecting unbalanced APU to ADC
Female XLR → Male TRRS phono - about 2-feet for connecting balanced device to APU
Male RCA → Male T(R)S phono - about 2-feet for unbalanced device to APU


A 2-feet length of balanced cabling (female XLR-to-phono) for DAC-to-APU is a decent balance of convenience while reducing risk of picking up noise. Since the APU and ADC will sit side-by-side, 6" is adequate for the TRRS-to-XLR male cable - feel free to go shorter!
The 3rd cable is just an RCA-to-phono wire. You could use a mono TS phono end since the connections are just the tip (signal) and the rest of the poles would be ground. Anyhow, I have some old TRS phono and RCA wires that I hacked up to make this. Again, a 2' length is convenient, you might want to make an even shorter if worried about noise pick-up over this unbalanced cable.

Something you might want to construct (optional) is a short bridging cable to go from pre-amp OUT to notch IN if you ever want to do ultra-high-resolution measurements of dynamic range! I took a mono TS phono cable and shortened it to around 4":

We'll talk about this one later.
With that, I have all the hardware pieces I need to make connections and start using the APU in conjunction with my usual Intel NUC-based computer measurement system.
For the record, here are the settings that I'll be reporting with:
- Room EQ Wizard 5.20.7 software - it's available freely, stable, very flexible!
- Unless stated otherwise, I'll use 32-bits, 96kHz for the ADC and DAC
- REW signal generator will apply 25th-bit dither
- FFT parameters: 128k points, Blackman-Harris 7 windowing, max 50% overlap
- Typically average of 8 captures
- Unless specified, results reported are unweighted
II. Measuring Dynamic Range (DR) with the Cosmos APU
I think it's best to be concrete, so let's do some measurements using the APU with the Topping D10 Balanced DAC which I know from previous testing has very good performance. Being USB-powered, it's also an easy one to set up on my test bench.
The measurement of DR takes the following steps:

As per AES17 convention, we get the Device Under Test (DUT) to play a -60dBFS 1kHz tone (formally, AES17 uses 997Hz for SNR measurements, I'll stick with 1kHz) into the APU pre-amp. The Cosmos APU will push the noise floor up into the linear range of our ADC so that we can accurately determine distortion and noise levels relative to that -60dBFS signal.
 |
| Topping D10 Balanced on the left, 5V USB lithium battery on the right to power the APU. |
 |
| Note the highlighted dB(A) N+D measurement. Take off the -1.41dBFS from that and add 60dB; this gives 125.4dB(A) dynamic range. |
That's an excellent dynamic range result better than 120dB using the +60dB gain setting. Despite the amount of gain, notice how clean the noise floor is.
I don't have an XLR dummy load but I know that when the Topping D10 Balanced isn't playing any audio, it will mute the output, dropping the noise floor. So let's look at what that noise floor looks like to give us an approximate measurable dynamic range of the "system" which includes my short XLR-TRRS cable. This is with the Cosmos ADC 4.5Vrms input setting. When the D10 Balanced playing a -60dBFS signal, it measures -1.42dBFS into the Cosmos ADC so I'll take that into account:

Nice, this suggests that with a 4Vrms balanced DAC, my Cosmos APU+ADC system should be able to measure a dynamic range of up to 145dB using the +60dB pre-amp. (-145dB of 4V is 225nV - Ivan's measurements of residual noise for his pre-production APU samples are around 130nV so we're in the ballpark considering the wiring, and plugged into an actual DAC.)
III. Measuring THD+N / SINAD with the Cosmos APU
We can now use the 1kHz notch filter portion of the APU to achieve accurate THD+N / SINAD even of very high-resolution devices like modern balanced DACs. Here's a block diagram of the process:

This is similar to the way Audio Precision does it, except of course we're using the Cosmos APU's analogue notch filter and band-pass filtering within the REW software, plus the convenience of applying a compensation curve.
While E1DA will provide a compensation file, we can easily create one ourselves. Here's how to quickly measure and edit a compensation curve to reverse the -30dB notch when displaying the REW FFT. We can do this by directly measuring the frequency response of the 1kHz notch using a DAC with a flat response across the audible frequencies from 20Hz - 20kHz. In my case, I'll use the Topping D10s DAC with linear phase, steep filter firmware installed:
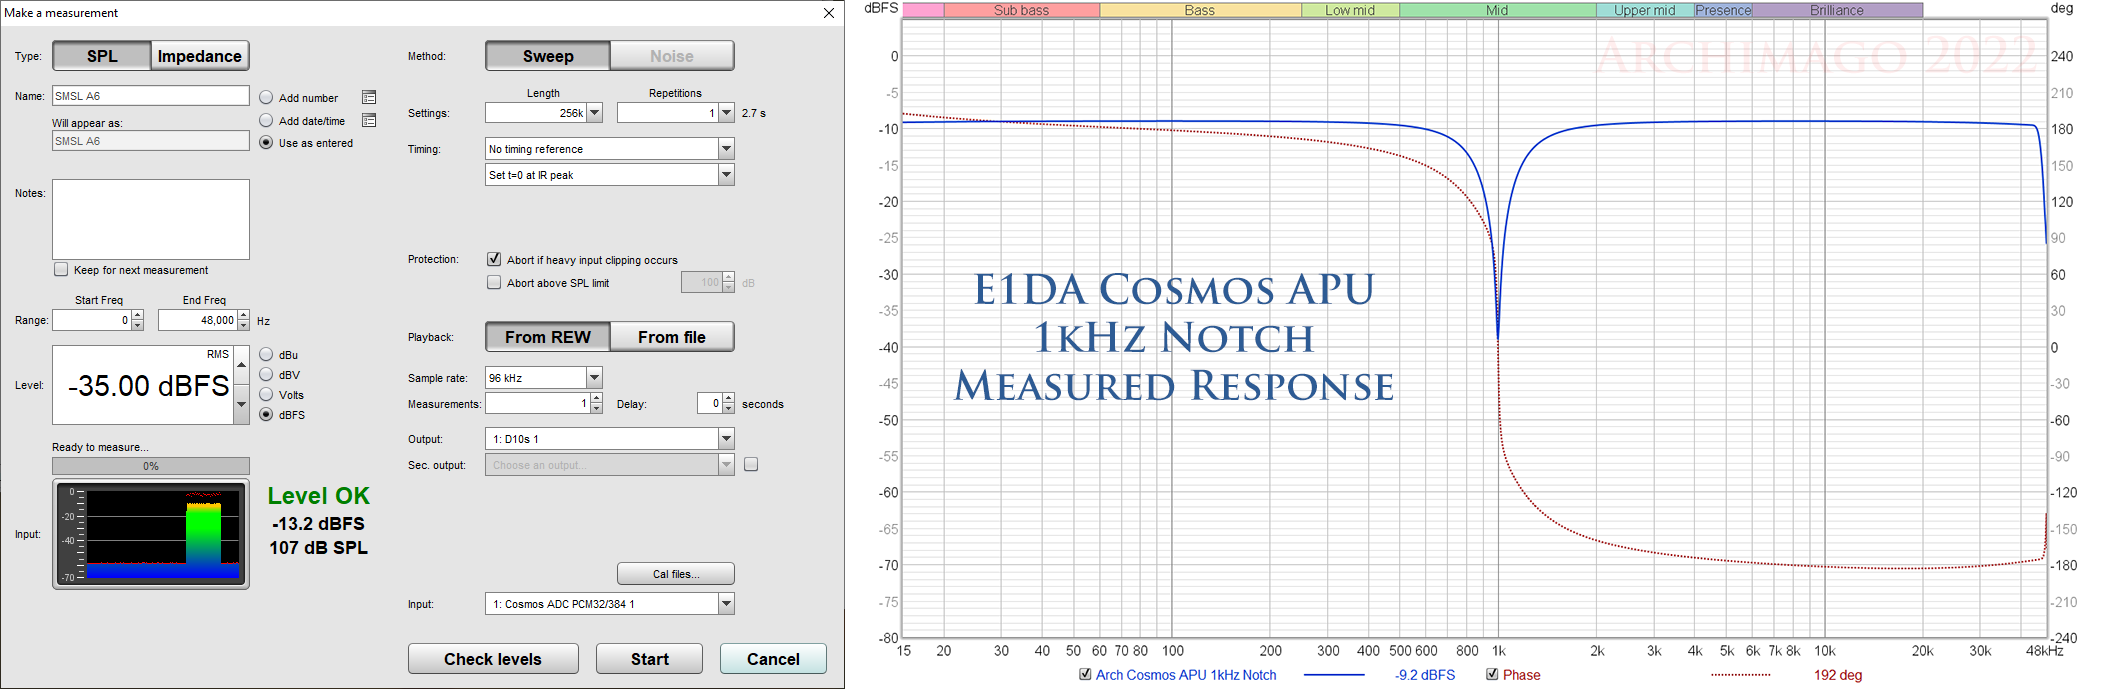
Now adjust the amplitude levels by setting the bottom of the notch as 0dB by applying an SPL offset:

Export this frequency response curve now to an editable text file - do not apply smoothing as this will round off the notch:


.png)
Here's my compensation curve derived from the steps above if you want to try. I assume there will be some slight variation between APUs so creating your own custom curve might still be best.
So, as a start, let's connect the high-quality Victor's 1kHz Oscillator to the APU+ADC for a peek:


 |
| Can compare with ASR's APx555 measurements. |
IV. Bridging the Pre-Amp & Notch Filter!
Suppose you have an ultra-high-resolution DAC with amazing dynamic range. And you want to get the very best dynamic range measurement possible out of the APU/ADC. This is what you do - you bridge the two functions - with both +60dB gain on the pre-amp and also use the 1kHz notch filter:
 |
| This is where the short 4" bridging phono cable comes in. |
%20(dBc).png) |
| 70.8 - 5.3 + 60 = 125.5dB(A) dynamic range. |
V. Using the Cosmos APU with other ADCs
While I've been using the Cosmos ADC above, there is no reason why one could not use another good quality ADC for these measurements. For example, here's the APU connected to my RME ADI-2 Pro FS measuring the same Topping D10 Balanced DAC:

Here's the dynamic range measurement using this system:
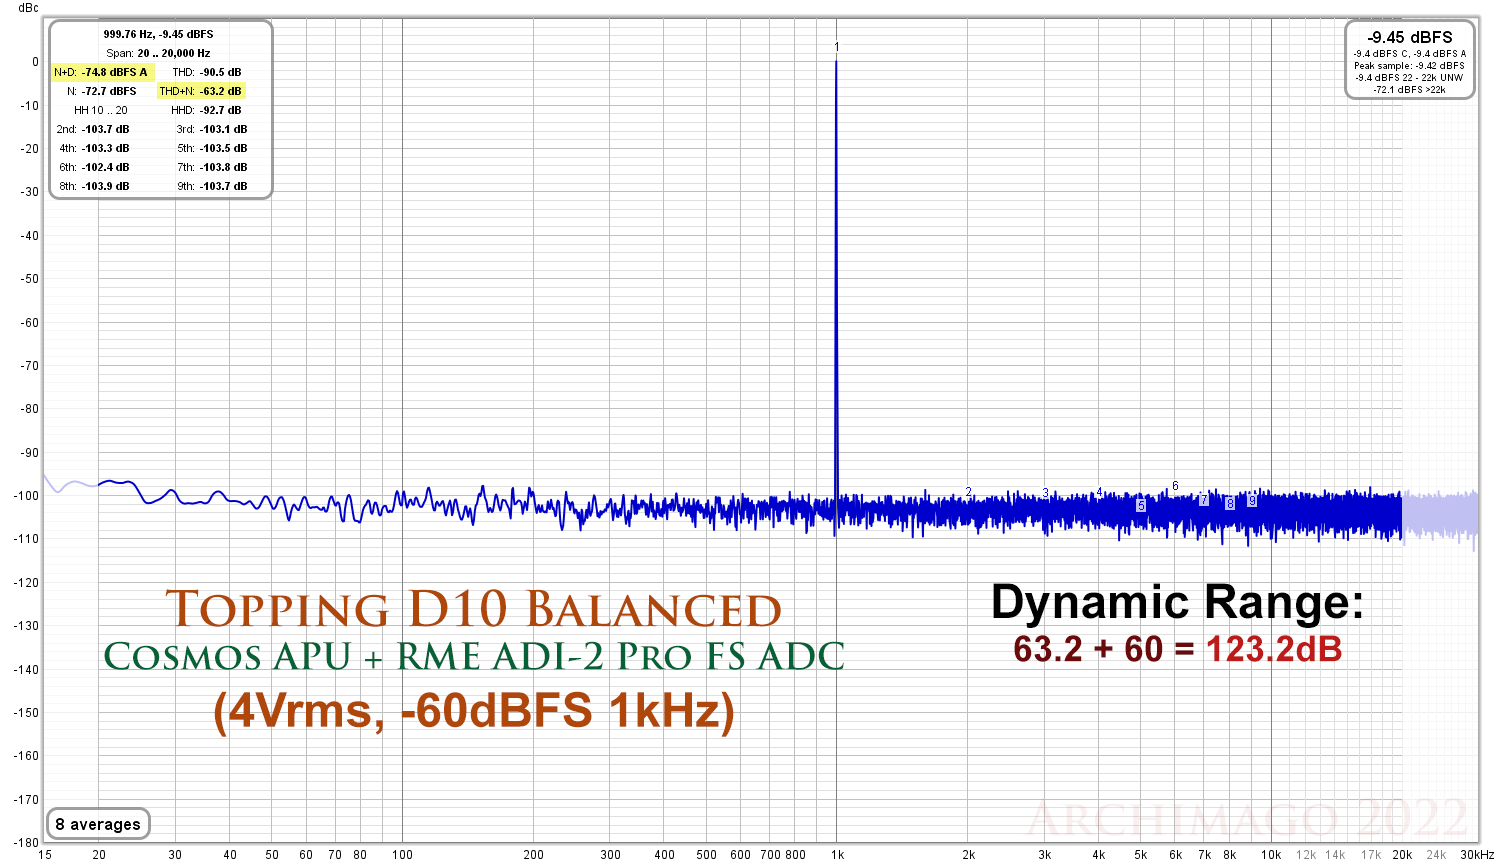 |
| DR 125.4dB(A) |
 |
| Apologies about the difference in scale on the Y-axis. |
While the Cosmos ADC is capable of greater resolution used on its own, when paired with the APU, the RME is more convenient with its user interface and better on-screen information. For example, the ability to change input reference levels between +4/+13/+19/+24dBu along with the RME's auto-adjust levels feature when input gets too high are very nice benefits.
VI. Summary
While I've labelled this article an "EARLY LOOK" since I'm using a pre-production unit, I hope the discussions here provide more than enough information to understand how this works and will get you well on your way with using the device.
Over the years, I've gradually improved my measurement capabilities with updates to the ADC; this being the first time I've added an analogue processor to the measurement chain.
With the exception of the Victor's Oscillator which is single-ended, not enclosed, and connected to a utility variable power supply picking up some 60Hz hum, notice just how clean the noise floor is with each of the measurements above.
In fact, even with the unbalanced RCA input of the Topping D10s USB DAC, the +60dB amplified signal maintains a very clean noise floor:
.jpg)
 |
| Can compare with ASR's APx555 measurements. |
.png) |
| DR 123.4dB(A) |
Of course, remember to keep those cables (especially unbalanced ones) nice and short and the APU/ADC measurement system away from electrically noisy devices like powerful computers when testing.
As I mentioned above, with +60dB pre-amp gain, be careful not to feed an excessively high signal into the APU - keep inputs to <3.5Vrms on the pre-amp side, and <10Vrms into the notch function to avoid potential damage. Also be mindful of the +48V phantom power when you're not plugging in a microphone!
Notice that for testing here, I did not use the 10kHz option for the notch filter. Ivan indicated that this function is useful for amplifier testing where loop gain drops vs. frequency and one can examine the increasing harmonic distortion products higher up like at H3 (30kHz). Obviously, one must be careful with the input voltage to the APU if testing high power amps.
Recently, Ivan also posted on using the Cosmos APU+ADC for vinyl ripping ;-). He is able to incorporate the RIAA EQ into the Cosmos ADC firmware (engaging the ES9822Pro's DSP) which basically turns the APU-ADC into a phono pre-amp/digitizer. Since the APU is a mono device, a stereo recording will require 2 passes and aligning the timing, or one could use 2 APUs. I was sent the custom RIAA firmware for the Cosmos ADC but haven't tried it yet. Will likely discuss this in a future blog post.
I see that L7AudioLab has posted on the Cosmos APU as well recently. Looks like his measurements of the Topping D90SE shows even higher SINAD results using the APU's 1kHz notch filter than even with the Audio Precision APx555; he got a result way up at SINAD 126-127! Alas, I have sold my D90SE so am unable to run such a test at this moment.
Ladies and gents, objective audiophiles, home audio measurement hobbyists, DIY'ers, yes, even audio hardware designers... With the Cosmos APU, aimed at around US$100 (who knows about final price in these crazy times, also possibly a self-assembled $70 version), paired with a decent ADC, we see an even greater opportunity for anyone to perform dynamic range, SNR, and 1kHz THD+N/SINAD measurements on hi-res devices like DACs at the level of, if not exceeding that of the APx555. Of course, there are more measurements to perform than just these, so I would still recommend a good ADC to run a battery of tests.
While obviously an Audio Precision can provide many additional features, the fact that we can even talk about making such comparisons with a professional US$25-30k piece of equipment is a testament to the low-noise and resolving ability of the Cosmos APU!
Very impressive work, Ivan.
--------------------
If you made it all the way to the end of this article, congrats. ;-)
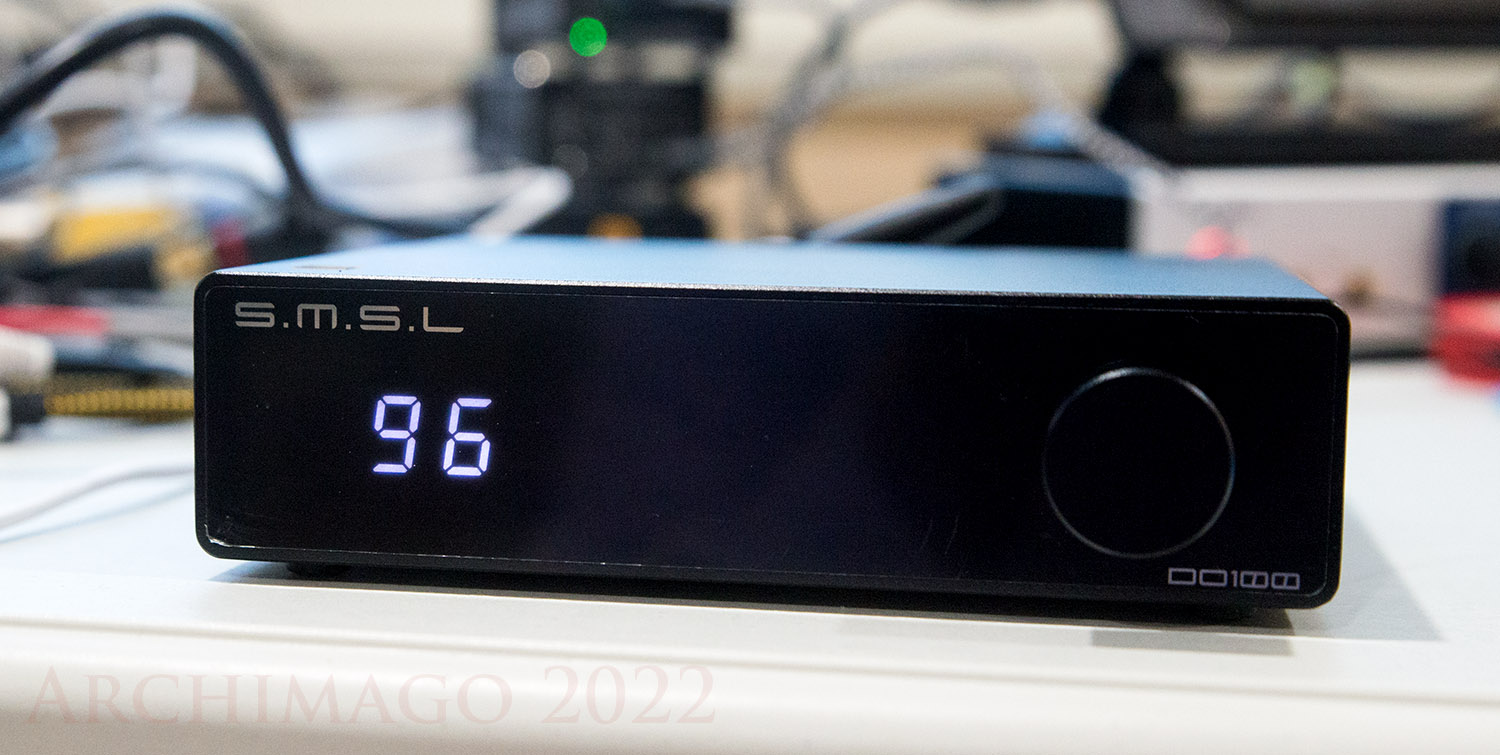
Here's a preview of the S.M.S.L. DO100 DAC (US$240):
.png) |
| H2-H9 harmonics all below -135dB. THD+N -124dB(A). |
%20APU%20(Computer).png) |
| DR 127dB(A) |

That's excellent. Thank you very much.
ReplyDeleteA pleasure oagstes,
DeleteI think it's great to get the news out about what's available or coming up! Helps with dispelling unnecessary mystique!
Hi Archi
ReplyDeleteA great read, thank you. I appreciate your effort on your page.
All the best
PS: I bought also a Topping D90SE. A great DAC. Really.
Greetings Juergen!
DeleteHope you're doing well!
Yeah, the D90SE is quite the device and very impressive the performance from that ES9083Pro with the 8-channel I/V conversion design. Looks like a similar idea with the SMSL DO100 with the dual ES9038Q2M for mono output and quad OPA1612.
Have a great spring and into summer man!
This chipset ES9038Q2M is NOT intended for desktop use, only for portable devices due to its limitations.
ReplyDeleteHi Read,
DeleteCorrect, the ES9038Q2M wasn't intended to be used as a desktop amp since it can operate on such low power hence commonly seen in mobile applications.
However, it does share many of the characteristics of its big brother the ES9038Pro. And at least with the DO100, it looks like they've integrated it into a dual-DAC package which does the job very well. So far, it's performing very much like a "little brother" to the D90SE but at a fraction of the price.
Anyhow, will have a look more in the days ahead into characteristics of this device when I do a more formal review...
Might get hot if you use it for high res files, must be a reason for that it is intended only for low voltage environments, I guess.
DeleteYeah, I'm sure the design will deal with temperature issues. The DAC is designed for hi-res performance as well as both current and voltage output modes.
DeleteOne more thing. I believe E1DA's upcoming Cosmos DAC will also be based on a dual-ES9038Q2M architecture. Presumably USB-powered as well based on the rendering here:
https://e1dashz.wixsite.com/index/cosmos-dac
Hi Archimago,
ReplyDeletereally good reading.
My comment is about THD of the Victor's oscillator, -141 dB is not what it is capable of (less than -155 dB). What do you think about it?
Martin
Interesting MG. I notice that there's some variability in the harmonics depending on the quality of the power supply I use... As you can see, I'm measuring this far from ideal circumstances.
DeleteWondering do you have an FFT of the Victor and what gear is being used to power the board and capture a THD of better than -155dB!?
Hi, there is a thread on diyaudio.com (I am sure you know about it), where I publish my experiments:
Deletehttps://www.diyaudio.com/community/threads/low-distortion-audio-range-oscillator.205304/post-7022462
I use Focusrite Forte+ passive Twin-T notch + 32 dB LNA. For powering the osc I use simple DC/DC converters 5/18V in series powered with 5V battery charger.
Martin
And here is what Victor measures:
Deletehttps://www.diyaudio.com/community/threads/low-distortion-audio-range-oscillator.205304/post-6817876
Impressive Martin,
DeleteMaybe the key is the DC/DC converter you're using. I haven't looked around but did Victor also speak about what power supply he's using by any chance?
I think Victor is using four 9V alkaline batteries.
DeleteMartin
Thanks! Hmmm, might have to give that one a shot ;-).
DeleteFor the time being with my variable power supply, I played around with it more and pumped voltage to 35V (from 33). Got almost THD -148dB. Not quite -155dB but not too bad especially with a THD+N -117.5dB.
See Addendum with the scaled APx555B FFT.
This comment has been removed by the author.
DeleteHi Archimago, it seems that you are on the right track. THD -148 dB is close to what Victor declares. I would increase the FFT points to the 512k-1M to go deeper in the noise.
DeleteMartin
Thanks for walking through how all of this is done and sharing the various measurements. On the various graphs where you've noted THD+N, I'm having trouble mapping that number to the graph. Take the SMSL for example. I see THD+N noted as 123.9 dB but looking at the graph, I'm not seeing anything that looks like noise components near that level. I do see a component at roughly -73 dB up in the 24 kHz range and a noise component at -89 dB around 17 kHz. Subtracting the 60 dB of gain then that gets me to -133 dB for the highest distortion tone. Is there additional ultrasonic noise that's not visible? Am I not quite understanding the calculations or the graph?
ReplyDeleteHi Doug,
DeleteI see you're looking at the 123.9dB is dynamic range measurement for the SMSL.
As you noted, what's happening here is that the graph shows a +60dB gain applied to the noise floor. So if we look at 17kHz and that -89dB noise, it's actually -89-60dB=-149dB.
Compared to the typical Audio Precision graphs you see online (like ASR) which often measures at 44.1kHz, I like going the "hi-res" route and will usually show my FFTs based on a 96kHz signal. I'll usually show near infra/ultrasound on the FFT as well (down to 15Hz and up to 30kHz) just in case folks have massive subs and even super-tweeters ;-).
Even though I show those extra frequencies, the THD+N measurement applies filtering between 20Hz to 20kHz so that 24kHz noise will not be applied to the final calculation (as you can see, the areas beyond 20-20kHz on either end faded out to indicate this). With a -60dBFS 1kHz signal, the harmonic levels are extremely low, so the |THD+N| result is basically a reading of the full RMS noise level which we add 60dB to to get the dynamic range - this summed amount is why we see a number like 123.9 rather than something lower as you would see with each frequency in the graph being down -130dB or less.
Probably a bit more than what you asked but hopefully it's clear!
Thanks for clarifying. I understand it now.
Delete